Saturday, April 28, 2012

Water Bead Goop


A lot of our play activities revolve around sensory exploration, particularly those involving touch and sound, because these are key areas for our girls. 
Both have tactile sensitivities and Bubble is very sensitive to sound so we try and expose them to these elements in small doses every day.
The crushed water beads we used in our Dinosaur Landscapes the other day went over very well so I thought we'd try it again on a larger scale. 
This activity was a lot of fun and the outcome was quite intriguing!

WE USED:

* water beads
(read more about them HERE and HERE)
* a blender
* plastic tub 

 We started with a bowl of water beads we've been playing with over the last week. Usually once our water beads are too broken up and mushy to play with anymore we mix them through our pot plants (they act as water saving beads and break down in the soil), but today we got out our old blender to see what would happen if we mixed them.

Scooping the beads into the jug using large spoons was great fine motor practice. 
Be prepared for lots of errant beads all over the floor, this part was best done on a hard easy to clean surface or outside.

I just had to include this photo of the girls in their dress ups scooping away :D

Once the jug was full we put the lid on and the girls took turns at turning it on and off. We talked about what was happening and opened the jug regularly to see what the beads looked like.
Obviously when using something like a blender take precautions with kids around - turn it off and unplug it from the wall before taking the lid off and supervise them at all times.

We actually had to add a lot of water as we went as the beads blended into a very thick goop.

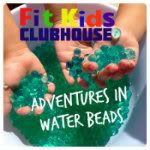
The girls were delighted to find that some beads remained perfectly intact while the rest transformed into a multicolored goop.

We poured the goop into a tub so the girls could explore and play with it.

The texture was amazing, Bubble and Squeak enjoyed squishing and running their hands through it and finding the intact beads.


We kept a tub of water and an old towel nearby so they could clean off their hands when the sensation became a bit much, then go back to it when they were ready.

It wasn't long before the dinosaurs were involved :)
The goop washed easily off the girls hands and clothes and we just emptied the water to the lawn since the beads are non toxic. 
We have left the goop in the tub outside to see what will happen to it over time as it dries out. We'll keep you posted!

Shared on:

Fit Kids Clubhouse


Thursday, April 26, 2012

Dinosaur Landscapes


Both Bubble and Squeak are very interested in dinosaurs and one of their favourite books at the moment is 'The Triceratops Twins', an ABC For Kids Read & Listen book based on an episode from Play School.

Inside the front cover of the book they detail how they made their dinosaur landscape for the story, so while the girls were at preschool yesterday (Squeak's first day!) I had a go at making some small portable versions as a surprise.

I have a stash of these cheap 5L containers from our local $2 shop which were the perfect size and height for the girls to access. I like that they have lids so we can pack them away when not in use.
A deep tray or play tub would work well too, or even building the landscape right in the sandpit if you have one.

First I attached some small bowls to the base with Blutac (sticky tack) to act as a lake. You could use anything for this - small foil pie trays, clean jar lids, the base from a juice bottle or build up sides using plasticine stuck to the base of your box.

Next came sand from the sandpit.

Then some cuttings from our big conifer trees in the backyard.
In the book they create their own trees for the landscape using toilet roll tubes and tissue paper which looks fantastic, that was a project I wanted to do when the girls were home though.

Then I added some river stones (found in the decorating isle of most dollar shops if you're not lucky enough to have access to them locally).

In the book they use blue cellophane as water, we didn't have any of that handy though so I used crushed water beads instead. They added a great extra sensory feature to the landscapes and the dinosaurs could actually swim in it.
We had water beads on hand but there are heaps of things you could use instead - real water, blue rice, streamers, polystyrene beads, or nothing at all!
(For more information on water beads check these posts HERE and HERE)

Don't be fooled by the fork in the photos by the way, I had intended to mash the beads but discovered this was next to impossible and ended up squishing them with my fingers instead.


Our finished landscapes. 
The girls have since added a lot of things to their boxes themselves; branches, upside down gumnuts (used as volcanos) and plastacine birds in the trees.


Wednesday, April 25, 2012

Paper Bag Butterflies

After making our Paper Bag Crowns today we tried out something a little different using the side join of our bags to create fold out shapes.
These were incredibly easy to make and could be used to make all sorts of symmetrically shaped pictures. The girls and I made butterflies but in future I'd like to try it out with other shapes like flowers, stars, cars etc...
Both girls had a lot of fun with these, especially the version involving paint!

WE USED:

* paper bags
* texta/markers
* scissors
* paint

Using a texta we drew one butterfly wing on our paper bag making sure to include one side seam in the center.
Bubble then cut around the line with her scissors.
I really enjoyed watching Bubble unfold her bag, I asked her during the cutting process what she thought we were making and she guessed the letter 'B' or a number '3'. As she unfolded the paper she gasped and exclaimed "it's a beautiful butterfly!".
The girls then used textas to decorate their paper butterflies.
We made a few more and decided to experiment with paint. We opened the cut bags and the girls chose some colours to squeeze onto one side in little dollops. Squeak especially loved this part and ended up with mountains of paint!

We then folded the opposite side back over and squished the two together to spread the paint around. When we opened the bag up again the girls were amazed at the beautiful colours on their butterfly's wings.

Squeak wanted her butterflies up on the wall, they look beautiful flying across our kitchen :)

Bubble wanted to play with her butterfly, so we attached it to a wooden ruler (a stick would work well also) with tape so she could make it 'flap it's wings'. We did laminate it first because she wanted to take it into the bath with her, I think the effect would be even better with paper wings though.


Paper Bag Crowns

Saturday night is 'movie' night at our house. The girls get to choose a DVD and stay up a bit later than usual, eating popcorn and making blanket forts in the lounge room.
Every Saturday I make popcorn for the occasion and put it into brown paper bags, cutting the top half from one of them for Squeak who hates having to reach down into a full sized bag. 
This past Saturday Bubble walked by as I was doing just that, picked up the top of the bag and put it on her head saying "thanks for the crown Mum!".
Genius.
Guess what we did today? :D

WE USED:

* brown paper bags
* textas/markers
* stickers
* scissors
* teddybears/dolls

This activity was so simple, I loved the fact that Bubble could do it all on her own and even little Squeak only needed minimal help.
We first turned our paper bag upside down so that the open end was facing us, then drew our crown design across it. 
Bubble then cut along the zigzag line carefully using her scissors.
Once she had cut along the line it was easy to open up the bag to create a crown.


The girls got busy with textas and stickers decorating their masterpieces. Glue and sequins/glitter, paint and cotton buds or ink stamps would be fun for this part as well.
They turned out super cute and the girls enjoyed making them so much they spent almost an entire afternoon creating a crown for every stuffed toy in the house.
Lots of fantastic fine motor practice and imaginary play.
After we'd made a few crowns I realised we could just use one bag to make a whole heap of them by layering the designs and reversing them once they were cut. This was much easier and meant we used much less paper as well. 
One paper bag made all of these! We'll definitely be doing this again.